Automating Jira: How to Create Smart Workflows for Teams

Nishil Patel
Oct 4, 2024
7 min read
In October 2020, Atlassian integrated Jira Cloud with automation features, which have since gained significant traction among Jira users across the globe. In this article, you’ll learn the basics of Jira automation. We’ve also covered practical workflows that can help you automate repetitive and monotonous work while managing projects using Jira.
Table of Contents
1.
Introduction
2.
What is Jira Automation?
3.
How to Create Jira Automation Workflows
4.
BetterBugs + Jira for Smart Bug Reporting Workflows
5.
FAQs
Jira took a major step forward when Atlassian integrated automation directly into Jira Cloud, making it a must-have tool for software teams. Now, routine tasks can be automated, allowing teams to focus on what matters most.
In this article, we’ll break down the fundamentals of Jira automation and show you practical workflows that can help your team save time and work more efficiently. Let’s dive in!
Jira automation is a no-code feature that lets you create rules to automate actions, processes, and tasks within your projects. It’s especially useful for medium to large-sized projects.
These automation rules can be customized with a series of conditions, streamlining repetitive and commonly used project actions, which saves teams significant time and effort. As of now, automation features are available for both Jira Cloud and Confluence.
Also Read: Top 10 Automation Testing Tools
Key Elements in Jira Automation
There are three fundamental building blocks to creating an automation rule in Jira. Much like using Lego bricks, these elements work together and can be configured in several ways to automate parts of Jira:
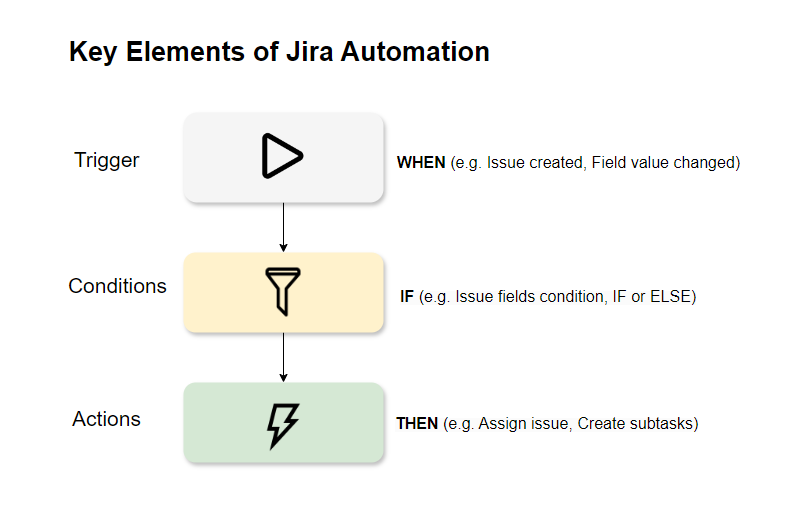
- Trigger: Initializes the automation process and sets off a rule. It’s the first step in the process.
- Conditions: Allows you to do conditional checks and modify the rule for the next step.
- Actions: Lets you define an action if the previous conditions match.
Moreover, the automation rule includes several other components to enable users to have complete control at the granular levels, including:
- Branching: To define conditionals as per issue relationships.
- Smart values: For Jira to access dynamic data from the project and perform logical manipulations.
- Rule actor: To set permissions for a user to execute a rule.
- Rule status: To determine the state of the rule (enabled, disabled, draft).
- Audit log: To keep track of and review rule executions. It can also be used for debugging purposes.
Also Read: Trello vs. Asana: What’s Best For You?
Rather than getting bogged down in tasks better suited for automation—like creating, deleting, and assigning issues or closing them—you can greatly benefit from using Jira automation. It enables you to free up valuable resources and expertise to focus on crucial project goals instead of spending time on monotonous and repetitive work. Here are some automation workflows that allow you to automate parts in your Jira project:
IMPORTANT: You'll need Project or Global Administrator permissions in Jira to create and manage automation rules. You can apply automation rules globally or to specific projects. The rules listed below are scoped to a particular project. Moreover, the rules are created, executed, and tested in isolation.
Also Read: Automation Testing 101
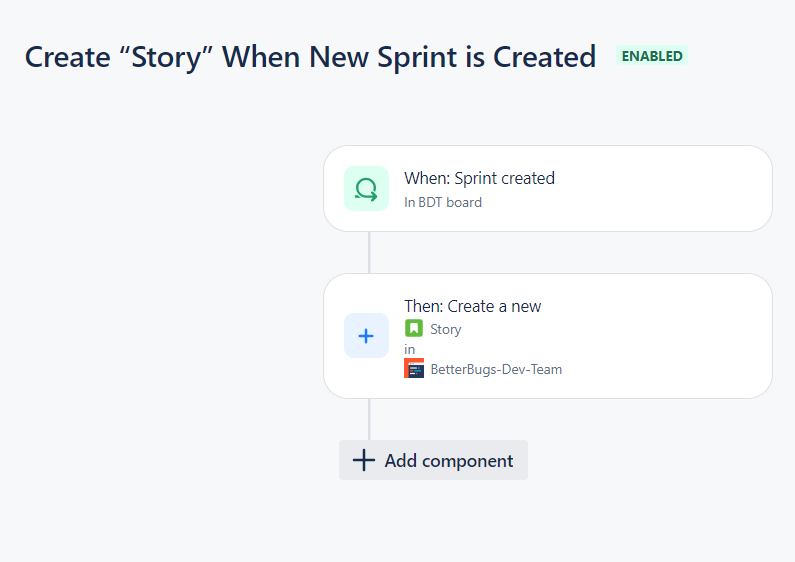
Workflow 1: Create “Story” When New Sprint is Created
Here’s a stepwise guide to auto-create a story (as an issue) when you create a new sprint in Jira:
- Open “Project Settings” from the left-pane menu
- Click on “Automation”
- Click the “Create rule” blue button placed on the top right area
- Search and select “Sprint created” from the “Add a trigger” search box
- From the Boards dropdown, pick a project board that applies to the rule and click “Next”
- Click “THEN: Add an action” to add a component
- Hit “All actions” to access all components. Search and click “Create issue” to add an action
- Select a project from the “Project” dropdown
- Select the Issue type as “Story”
- Enter placeholder text for summary and description
- Click the “Turn on rule” blue button from the top right
- Provide a “Rule name”
- From the “Who can edit this rule?” dropdown, select the person who can edit the rule.
- Click “Turn on rule”
You are all set to test out the new automation rule. With this one, creating a new sprint will auto-create a story in the “Backlog” item list, which you can edit and drag to the sprint issue list.
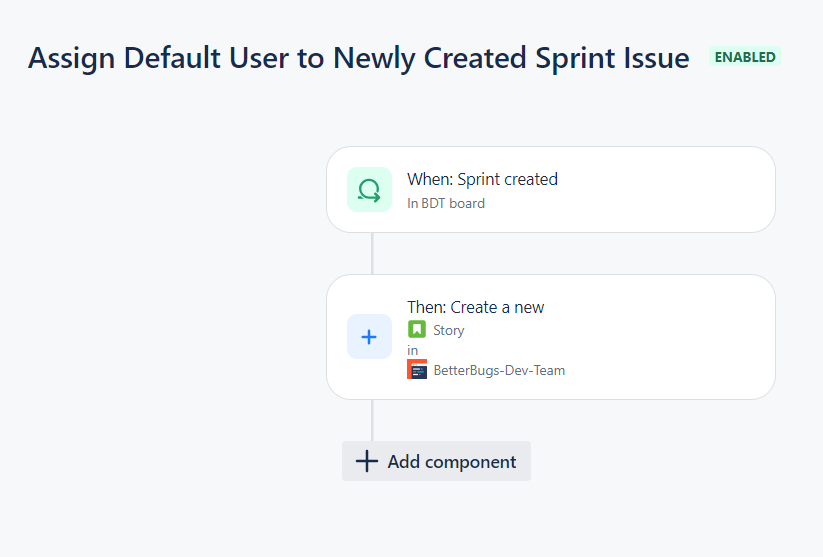
Workflow 2: Assign Default User to Newly Created Sprint Issue
The steps to add a default user for a newly created sprint issue are similar to “Workflow 1”. Other than that, you’ll have to set up a default “Assignee” while setting the rule.
Here’s how to do it:
- Repeat steps 1-9 from Workflow 1
- Below the “Issue type”, open the “⚙ Choose fields to set” dropdown.
- Search “Assignee” and check. It will get added to “SELECTED FIELDS”.
- Next, select the default “Assignee” from the Assignee dropdown (available below the Description area).
- Fill out the issue summary and description placeholders
- Click the “Turn on rule” blue button from top right
- Provide a “Rule name”
- Next, select a person who can edit the rule from the “Who can edit this rule?” dropdown
- Press “Turn on rule”
This rule would run whenever a new sprint is created followed by an auto-generated “story”. A default user will be assigned as the issue’s Assignee.
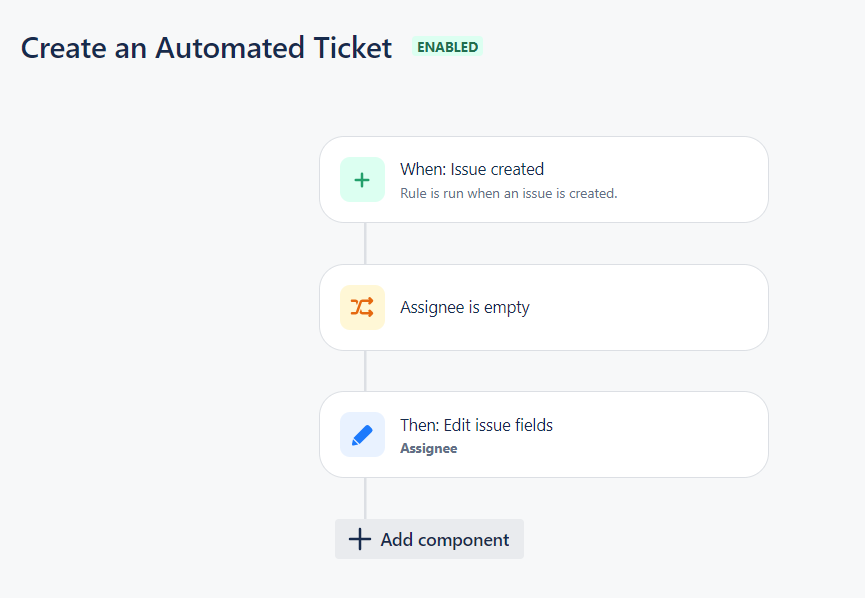
Workflow 3: Create an Automated Ticket
You can consider the following rule to create an automated ticket if an unassigned issue is detected in a project. For instance, if a stakeholder creates an issue (e.g., task, bug, or story) without specifying an assignee, the ticket will automatically be assigned to the project manager (as a default Assignee).
Here are the steps:
NOTE: Steps 1 - 3 (navigating to the Automation page for creating a rule) and steps 11 - 14 ( turn on the rule with a suitable name and assign it to the person with edit rights) from Workflow 1 are the same for all workflows. So, they are skipped in the following workflows.
- Go to the “Automation” page and click the “Create rule” button
- From the “Add a trigger” search box, search and add “Issue created” and click “Next”
- Click “IF: Add a condition” and select “Issue fields condition”
- From the “Field” dropdown, select “Assignee”
- Next, set the “Condition” to “is empty”. Click “Next”
- Click “THEN: Add an action”
- Search and click “Edit issue” from the Add an action search box
- Click the “⚙ Choose fields to set” dropdown, check “Assignee”
- Next, set the default “Assignee” from the dropdown below, click “Next” and you are all set.
- Turn on the rule with a name and assign it to the person with edit rights.
Your rule is good to go.
Workflow 4: Auto-Assign User Based on Issue Type
The following workflow covers the scenario where a newly created issue item would be auto-assigned to a user based on the issue type. Here’s an overview of the steps:
- Start the trigger: When an issue is created.
- Identify the Issue Type: Determine the Issue type: Is it a “bug” or a “task”?
- Assign user based on Issue Type: If the issue is a “bug”, assign it to a member of the QA team. If it’s a “task”, assign it to another team member.
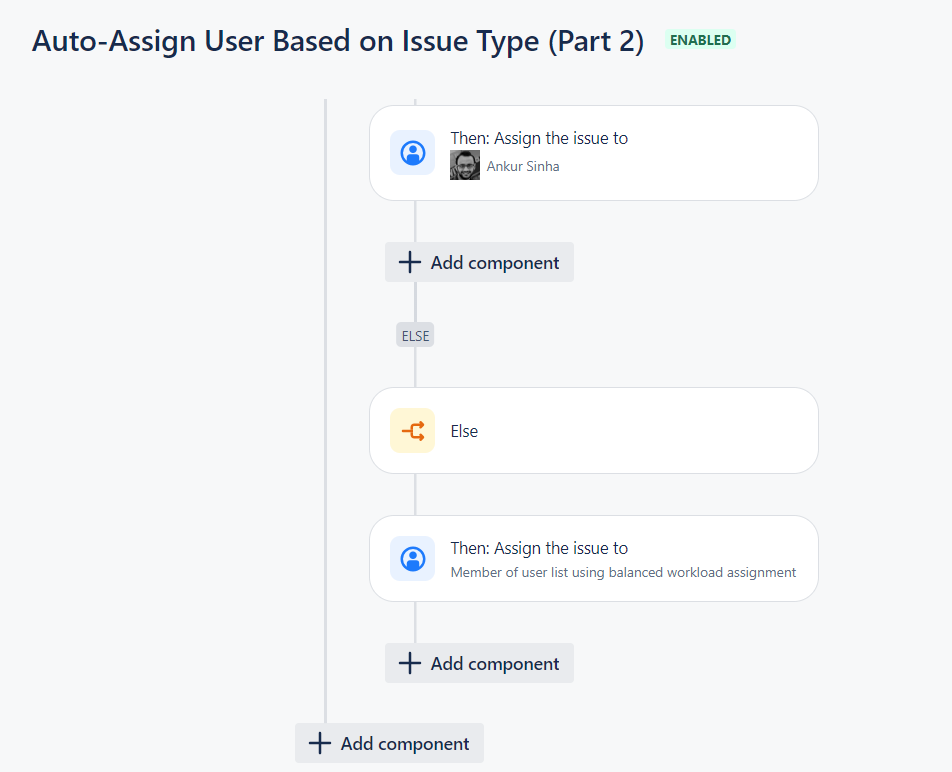
- Handle other Issue Types: For issues that are neither a “bug” nor a “task”, assign them to a team member (from a predefined list of users) with the fewest open issues using the balanced workload automation feature in Jira.
- Turn on the rule
Here’s a stepwise guide to creating the automation rule:
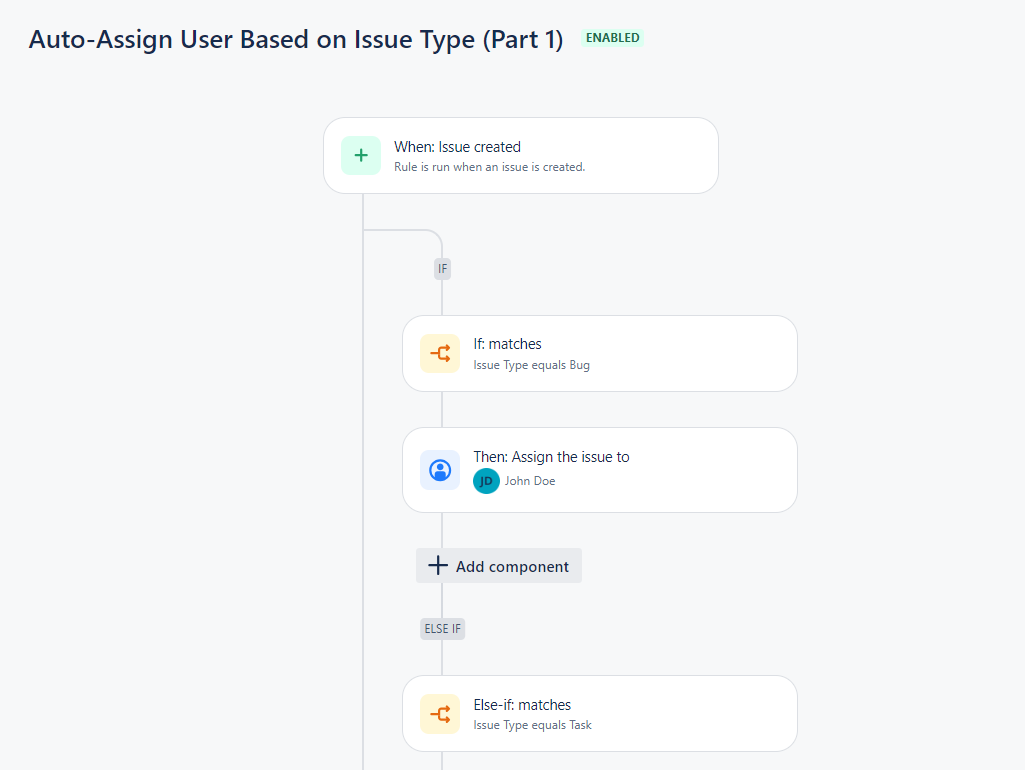
(NOTE: The complete workflow diagram is divided into two parts for simplicity. Part - 1 and Part - 2 combine to create the full workflow.)
- Go to the “Automation” page and click the “Create rule” button
- From “Add a trigger”, select “Issue created” and click “Next”
- Click “IF: Add a condition” followed by “IF or ELSE: Add condition options”
- Click “Add conditions…” and select “Issue fields condition”
- From the “Field” dropdown, select “Issue Type”
- Set the “Condition” to “equals” and “Value” to “Bug”. Click “Next”
- Click “THEN: Add an action”
- Search and select “Assign issue”. Keep the “Assign the issue to” option to “Specify user”
- From the “Select a user” dropdown, select the user (who will be assigned the “bug” issue) and click “Next”
- Click “+ Add else” below the “+ Add component” button in the workflow diagram
- Click “Add conditions…” under the “Conditions” option and select “Issue fields condition”
- From the “Field” dropdown, select “Issue Type”
- Set the “Condition” to “equals” and “Value” to “Task”. Click “Next”
- Click “THEN: Add an action”
- Search and select “Assign issue”. Keep the “Assign the issue to” option to “Specify user”
- From “Select a user”, select the required user (who will be assigned the “task” issue) and click “Next”
- Click “+ Add else” below the “+ Add component” button in the workflow diagram
- Click “Next” (No more conditions are required)
- Click “THEN: Add an action”
- Search and select “Assign issue”
- From the “Assign the issue to” dropdown, select “A user in a defined list” option
- Set the “Method to choose assignee” to “Balanced workload”
- Set the “JQL to restrict issues” to “statusCategory != Done”
- From the “User list” dropdown, select the list of users you want in the defined list
- Finally, turn on the rule with a name and assign a user with the edit rights.
Also Read: Bug Lifecycle: Explained
Workflow 5: Auto-Create Subtasks
The following automation rule lets you auto-create subtasks for a newly created task. Moreover, the rule has an additional option to set a custom value for “Labels” for a subtask (If you skip this rule, the workflow still works fine). Here’s an overview of the rule:
- Create an issue
- Set the Issue Type to “Task”
- Create three subtasks for a newly created task
- Add the “FEATURE” label to the third subtask (optional steps)
- Turn on the rule

- Navigate to the “Automation” page and hit the “Create rule” button
- Select “Issue created” using the “Add a trigger” search. Click “Next”
- Click “IF: Add a condition” and select “Issue fields condition”
- Set the “Field” to “Issue Type”, “Condition” to “equals”, and “Value” to “Task”. Hit “Next”
- Click “THEN: Add an action” and select “Create sub-tasks”
- Create three subtasks and add placeholders for summaries.
- OPTIONAL STEP 1: Click the “Add fields” option for the third subtask
- OPTIONAL STEP 2: Select the “Project”, set the “Issue type” to “subtask, and “Parent issue” to “Current issue”
- OPTIONAL STEP 3: Click the “⚙ Choose fields to set” dropdown, check “Labels”
- OPTIONAL STEP 4: Add a custom label(s) (e.g. FEATURE) and hit “Next”
- Turn on the rule, give it a name, and set the edit rights.
Pro Tip: While adding “Labels”, ensure it’s just one word. Else the automation would throw an error. For example, for “Labels”, you can use something like “LABEL”, but you cannot use “TEST LABEL”.
You’re all set.
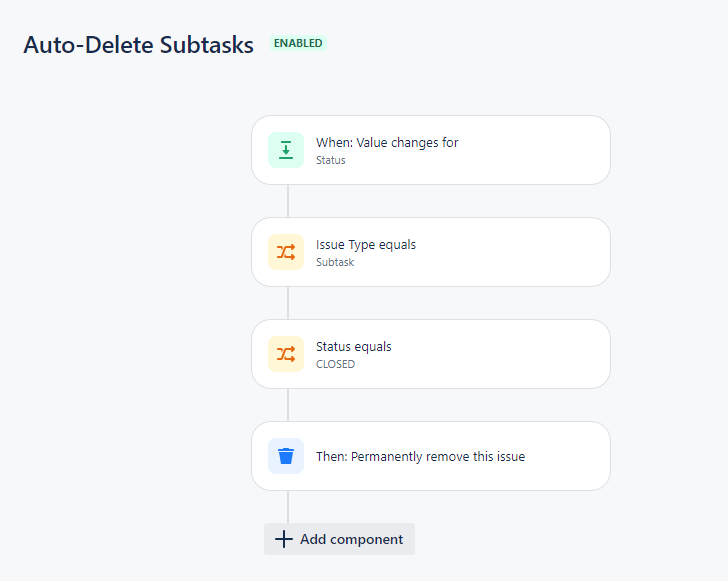
Workflow 6: Auto-Delete Subtasks
Here are the steps to create a Jira automation rule that permanently deletes a subtask when the status is updated to CLOSED. It's a slick approach for deleting minor or temporary subtasks that are no longer relevant or necessary.
(NOTE: Once the automation rule is correctly set and a subtask gets deleted upon closure, the delete action can’t be reversed. Please use the rule cautiously.)
- Go to the “Automation” page and click the “Create rule” button
- Select “Field value changed” from the “Add a trigger” search box
- From the “Fields to monitor for changes” dropdown, select “Status”
- Next, from the “Change type” dropdown, select “Any changes to the field value”.
- Keep the “For” dropdown value unchanged (it’s preset to “All issue operations”) and click “Next”
- Click “IF: Add a condition” to add a component and select “Issue fields condition”
- From the “Field” dropdown, select “Issue Type”
- Set the “Condition” to “equals”
- Set the “Value” to “Subtask” and click “Next”
- Select the “IF: Add a condition” and select “Issue fields condition”
- From the “Field” dropdown, select “Status”, and Set the “Condition” to “equals”
- Set the “Value” to “CLOSED” and click “Next”
- Click “THEN: Add an action” and select “Delete issue”
- Turn on the rule with a suitable name. Finally, assign it to the person with edit rights and turn it on.
Workflow 7: Auto-Add Story Points
Story points in Jira are a relative unit of measurement for estimating the effort required to complete a backlog item, factoring in complexity, required time, and related risk levels. Story points aim to break down work into smaller chunks to manage workload and better project tracking. For example, if 1 story point denotes ½ day of work and effort requirement, a backlog item marked with 6 story points should ideally take 3 days to complete.
In Jira, you can use “Smart Values” to get the sum of story points for your project tasks. Smart Values are placeholders that allow Jira to pull dynamic data from your project based on predefined rules.
The following rule enables Jira to auto-update the story point summation value whenever the individual values change, without any manual effort on your part:
- Go to the “Automation” page and click the “Create rule” button
- Select “Field value changed” from the “Add a trigger” search box
- From the “Fields to monitor for changes” dropdown, select “Story Points”
- Next, from the “Change type” dropdown, select “Any changes to the field value”.
- Keep the “For” dropdown value unchanged (it’s preset to “All issue operations”) and click “Next”
- Click “IF: Add a condition” to add a component and select “Issue fields condition”
- From the “Field” dropdown, select “Issue Type”
- Set the “Condition” to “equals”
- Set the “Value” to “Subtask” and click “Next”
- Next, click “FOR EACH: Add a branch” to Add a component
- Select “Branch rule / related issues”
- Select “Parent” from the “Type of related issues” dropdown and click “Next”
- Click “THEN: Add an action” and select “Edit issue”
- From “⚙ Choose fields to set”, check “Story Points”
- In the Story points fields enter the smart value “{{issue.subtasks.Story Points.sum}}” and click “Next”
- Turn on the rule with the rule name, and assign it to a user.
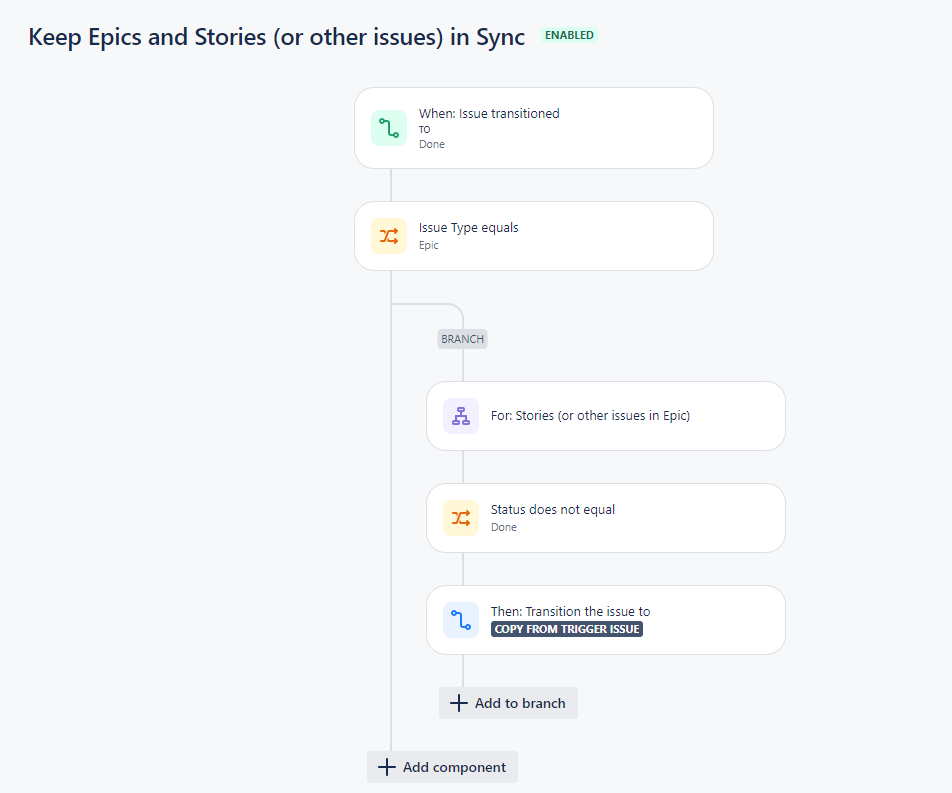
Workflow 8: Keep Epics and Stories (or other issues) in Sync
When you finish tasks in an epic, you usually want to mark all of them as DONE. There’s a simple way to automate this: when an epic is marked as DONE, all the issues within that epic will automatically be marked as DONE too.

Here are the steps:
- Go to the “Automation” page and click the “Create rule” button
- Select “Issue transitioned” from the “Add a trigger” search results
- Keep “From status” blank. From the “To status” dropdown, select “DONE”. Hit “Next”
- Click “IF: Add a condition” to add a component and select “Issue fields condition”
- From the “Field” dropdown, select “Issue Type”
- Set the “Condition” to “equals”
- Set the “Value” to “Epic” and click “Next”
- Next, click “FOR EACH: Add a branch” and select “Branch rule / related issues”
- From the “Type of related issues” dropdown, select “Stories (or other issues in Epic)”. Hit “Next”
- Click “IF: Add a condition” and select “Issue fields condition”
- From the “Field” dropdown, select “Status”
- Set the “Conditions” to “does not equal”.
- From the “Value” dropdown, select “DONE” and click “Next”
- Click “THEN: Add an action”
- Search and select “Transition issue” and set the “Destination status” to “Copy from trigger issue”.
- Turn on the rule and you’re all set.
BetterBugs is a visual bug-reporting tool that enables you to create crazy-fast and perfect bug reports for developers. It’s available as a free Chrome extension.
BetterBugs seamlessly connects with your Jira workspace to speed up bug-reporting workflows for your project. Using BetterBugs, you can instantly share comprehensive bug reports directly from your browser to your Jira workspace. It also connects with several other project management tools, such as Asana, Linear, GitHub, and others.
With every bug report, you get:
- Visual proof of issues (screenshots, screen recordings, last two-min auto-recorded video of all browser activities with Rewind)
- Developer logs (console logs, network requests, device info, URL, metadata, storage state, and others)
- Backend event logs (from the connected Sentry project)
- And much more!
You won’t have to manually explain issues or juggle multiple tools to collect data; everything is included in a comprehensive bug report accessible through a simple link within your Jira project. Plus, you can leverage the BetterBugs AI assistant to help with debugging.
Once you connect BetterBugs to your Jira project workspace, it automatically fetches the template from the linked workspace. Just fill in the necessary details (Project, Issue Type, Assignee, and more), and your report is ready to share in Jira, right from your browser.
Watch Video: How to Connect BetterBugs with Jira within Minutes
Quick Guide to Connect BetterBugs with Jira
1. Install BetterBugs Extension: Download and set up the BetterBugs extension.
2. Capture the Bug: Use the Screen Capture, Screen Recording, or Rewind feature to document the bug.
3. Add Bug Details: Enter a bug title and any additional information about the bug.
4. Connect to Jira:
- Open the "Send to your tools" dropdown in the top right corner of the screen.
- Click "Connect Jira" and authorize BetterBugs by clicking "Accept".
5. Select Workspace and Project: Choose your BetterBugs Workspace and Project (to which you want to connect Jira) from the dropdowns.
6. Create Jira Issue:
- Open the "Send to your tools" dropdown again.
- Select "Jira issue" to fetch fields for "Your Jira task info". Fill in details (Project, Issue Type, etc.)
- Click "Upload Bug".
A new tab will open with the created Jira Task, including all details and a link to the complete bug report. There you are. You have successfully connected Jira with BetterBugs!

Nishil is a successful serial entrepreneur. He has more than a decade of experience in the software industry. He advocates for a culture of excellence in every software product.
Meet the Author: Nishil Patel, CEO, and Co-founder of BetterBugs. With a passion for innovation and a mission to improve software quality.
We never spam.
Nothing here!
Share your experience with the founderhere!